Categories
Laser Cutting

Laser-Cut Copper Foil Graduation Cards

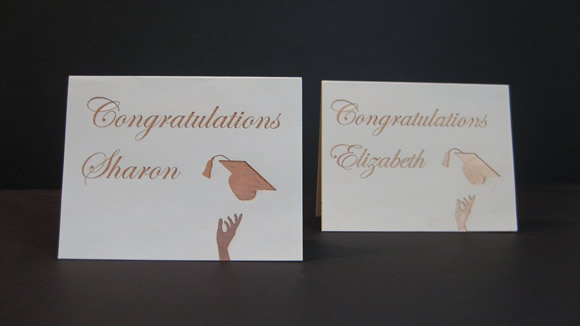
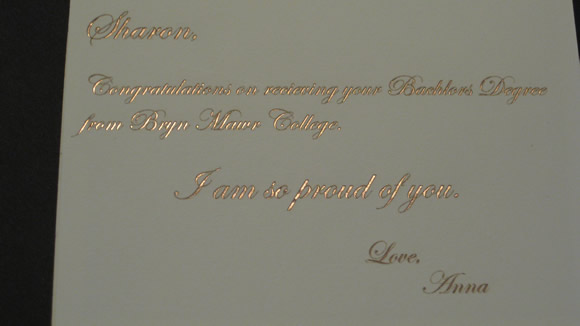
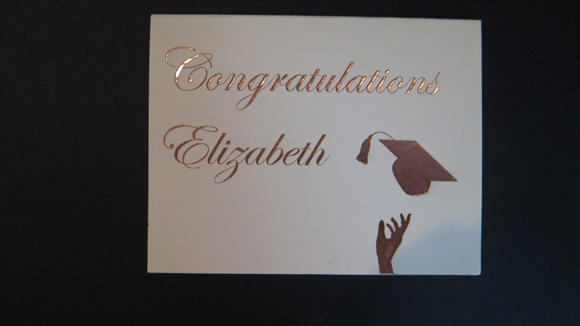
All my sisters are now college graduates (with at least 1 degree).  Congratulations to Sharon Kaziunas for graduating from Bryn Mahr College with her BA and to Elizabeth Kaziunas who graduated from Syracuse University with her MA in Information Science.  We now have two Masters of Information Science in the family.

I thought I would commemorate the occasion by laser cutting them each a personalized graduation card.

How The Cards Were Made

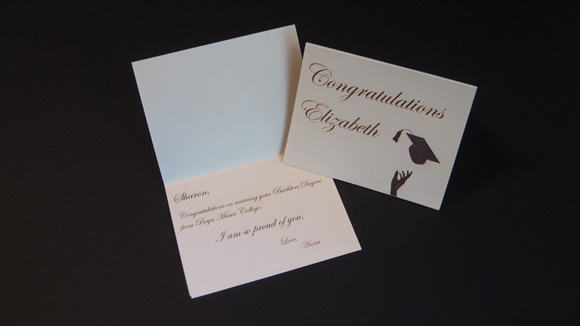
The cards were etched on the laser cutter using a “wood” setting.  This removed the paper material under the etch, leaving a cut out area for both the text and the image.  You can see in the pictures below that the paper was removed during the etch.  I had to use a x-acto knife a little to remove some bits of paper that hung on.

The cards are made of two layers of paper (shown below).  The front of the card and the inside of the card.  I put them together this way so I could sandwich the foil in the middle of the card and only have it showing through the gaps in the lettering.

I used two pieces of copper foil per card,  cut it to the dimensions of the folded card.  I put the cards together (without adhesive) with the front “congratulations” and the inside “text’.  Then,  I removed the adhesive backing and stuck the foil behind the lettering.  I then used a glue stick to adhere the two card sections together.

graduation card
graduation card
graduation cardgraduation cardgraduation cardgraduation card
graduation card graduation card

Categories
Fab Academy Providence -Year II - Teaching tutorials / notes

How to Manually Reset the Start Point on the Epilog Mini Laser Cutter

Problems:

  1. The laser cutter is not beginning to cut where you want it to. (It is beginning too far up or down on the material to be cut or is cutting too far left or right)
  2. The laser is cutting off the bed area (far left or far right).

Solution – Manually Reset the X/Y start point

When the laser is not running:

  1. Make sure the laser “pointer” is on.
  2. Press the X/Y off button on the laser control panel.
  3. Press the “Go” button
  4. Manually (with your hands) move the laser head (use the pointer to gauge the actual start point).
  5. Press the “set home” button
  6. Press the “job” button
  7. Send your file to the laser
  8. Press “go” to print the file.
Categories
Fab Academy AS220 - Providence, RI Fab Academy Providence -Year II - Teaching Laser Cutting

Laser-Cut Acrylic Press-Fit Construction Kit

I am working through all of the Fab Academy / How to Make Almost Anything projects a second time (as a TA) with the students of the 2011 Fab Academy. My project from last year for the computer-controlled cutting unit was a tension-fit construction kit made from a deck of cards. This year I did some text cuts in masionite (hardboard) and then used some brightly colored acrylic that I found in the scrap bin at AS220 Labs. The resulting construction kit used pink, white, opaque black, translucent black, and blue acrylic. I created the following piece styles:

  • rectangular star piece (cut in black)
  • rectangular diamond piece (cut in white)
  • round piece (cut in all colors)
  • bottom connector piece (used to connect any two pieces together or to help the construction stand up)
  • standard connector piece

""

"" "" ""  

Masionite Test Cuts


""""

Categories
Fab Academy AS220 - Providence, RI Fab Academy Providence -Year I - Student Projects

My Illuminated Fab Academy Diploma

fab academy diploma

I was not able to be present at the Fab Academy graduation ceremony at Fab 6 in Amsterdam, but Tomas Diez (the Fab Academy Coordinator) sent me my diploma file so I could lasercut my diploma myself in true DIY fashion. The diplomas fabbed for the graduation ceremony were cut from green acrylic. I had some clear acrylic laying around, so I used that instead. The acrylic diploma is shown on a lighted base that I put together for display purposes.

fab academy diplomafab academy diplomafab academy diploma