Categories
Flexible Circuits Halloween

Halloween 2011 – Glowing LED Oni Costume

So its Halloween…. Better plan all week, better plan all month, better plan all year……

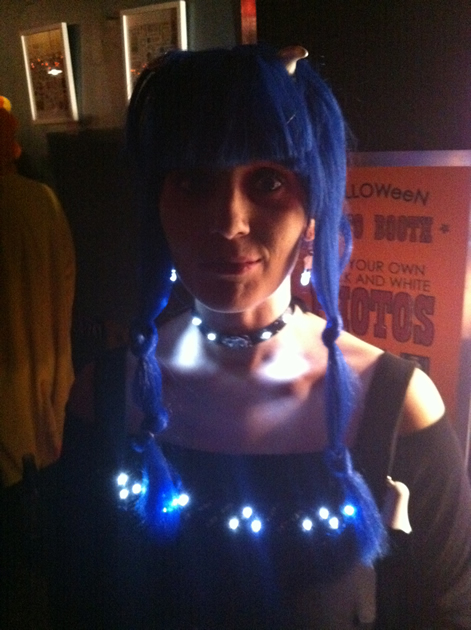
Soft circuits LED oni costume in action. Sewn with conductive thread, LEDs slowly fade in and out and are controlled by an Lilypad Arduino and powered by a Lilypad LiPower supply. The dress will run for at least 11 hours continuously. It may run much longer than that, but I haven’t tested it for longer than 11 hours.

The earrings are basically throwies (LEDs taped to a coin cell battery) with earring hooks attached with coat-weight thread.  The necklace is four Lillypad LEDs wired with conductive thread in parallel to a coin cell battery.

Categories
Fab Academy Providence -Year II - Teaching

MTM Snap Shield

Although Jonathan Ward had our MTM Snap running on his last trip to Providence, he recommended that we replace the individual stepper boards with the Arduino shield that he and Nadya Peek had created.  It seems some faulty wiring had cooked two of the stepper drivers and that we needed the increased capacitance of the shield. I milled, stuffed and assembled the shield.  Now to test it.

Stuffed MTM Snap Arduino Shield

MTM shield

Freshly Milled MTM Snap Arduino Shield

MTM Shield

Categories
Fab Academy AS220 - Providence, RI Fab Academy Providence -Year II - Teaching

FabRC – Fab Academy Final Project Progress

Final Project Description

For my Fab Academy final project I have been working on a RC Car. In its final state it should:

  • Drive forward, backward and be able to stop
  • Turn left and right (forwards and backwards).
  • The car will be linked to the controller through wireless radios that communicate with modified hello Arduino boards.
  • The modified hello Arduino boards have an extra 6-pin header in order to access the analog pins on the micorcontroller (for control buttons / pots.

Items Currently Completed

  • Arduinos and servos working together
  • Radio and battery boards designed, milled and working

Completed Radio Boards


Completed Hello Arduinos

Completed Battery Connector Boards


Completed Hello Arduino w/ Analog Pin Header
There were no analog pins pulled out to a header on the hello Arduino board – I needed some for this project – so I added an analog pin header.

Hello Arduino w/ Analog Pin Header (traces & outline)

Battery Connector PNGs (traces & outline)

Radio Board PNGs (traces & outline)

Not Completed / Not Working Yet

  • The radio communication code has not been tested yet (short on the radio boards – still troubleshooting)
  • Still working on the press-fit car design – the car axels are not ready yet.
  • The servo controls are not hooked up.

Download Design Files (Eagle)

Get PNGs For Milling

Bill Of Materials

  • Coming Soon / Export from Eagle Files

Development Plans

  • Finish building the car
  • Test the radio boards
  • Hook up controls to the servos
Categories
Fab Academy AS220 - Providence, RI Fab Academy Providence -Year II - Teaching

FabRC – Project Developments

I am working towards my Fab Academy final project – a digitally fabricated RC car.

Items Completed So Far:

Radio boards have been designed (based on the JeeLabs RFM12B Board)


I designed the battery connector boards
battery_schem
battery_board

Hello Arduino boards milled, stuffed and programmed with Arduino bootloaders and tested with the servos

Tasks That Still Need to Be Completed:

  • Radio boards need to be milled and assembled.
  • Battery connector boards need to be milled and assembled.
  • Radio boards need to be tested to see if they communicate with each other
  • Car controls need to be figured out
  • Code needs to be modified / written and tested to make the radios communicate with each other.
  • Code needs to be written for the car controls.
  • Car framework (wheels, axels, body) needs to be designed and assembled

Items That Still Need to Be Resolved / Not Working Yet:

  • No analog pins on the Hello Arduino? How to hook up the controls?
  • Use Fabkit instead? (burned the bootloader, but the Arduino IDE won’t talk to the chip).
  • “Fingers crossed” that the radio boards will actually work.

Completion Schedule:

  • Planning on completing the project by the June 1 deadline . Otherwise, before the August 15 final completion date.