Categories
Fab Academy AS220 - Providence, RI Fab Academy Providence -Year II - Teaching

FabRC – Fab Academy Final Project Progress

Final Project Description

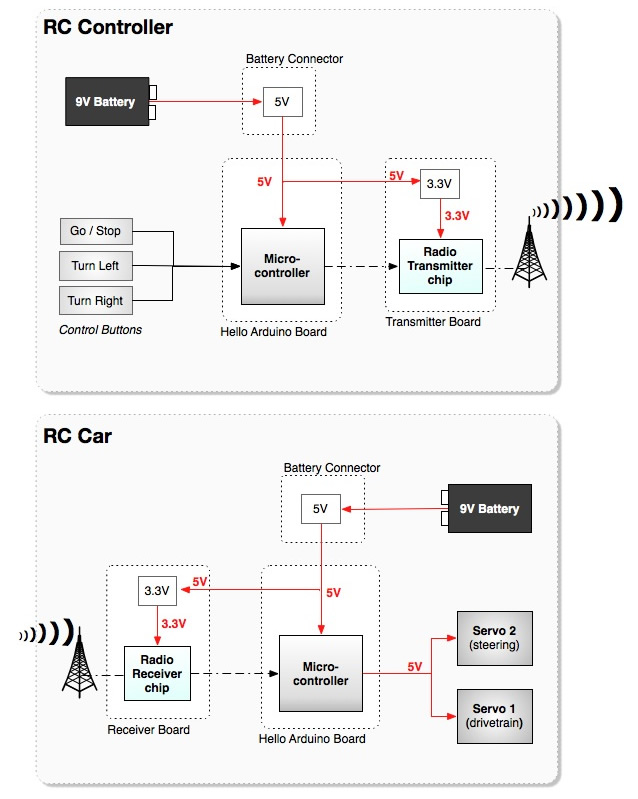
For my Fab Academy final project I have been working on a RC Car. In its final state it should:

  • Drive forward, backward and be able to stop
  • Turn left and right (forwards and backwards).
  • The car will be linked to the controller through wireless radios that communicate with modified hello Arduino boards.
  • The modified hello Arduino boards have an extra 6-pin header in order to access the analog pins on the micorcontroller (for control buttons / pots.

Items Currently Completed

  • Arduinos and servos working together
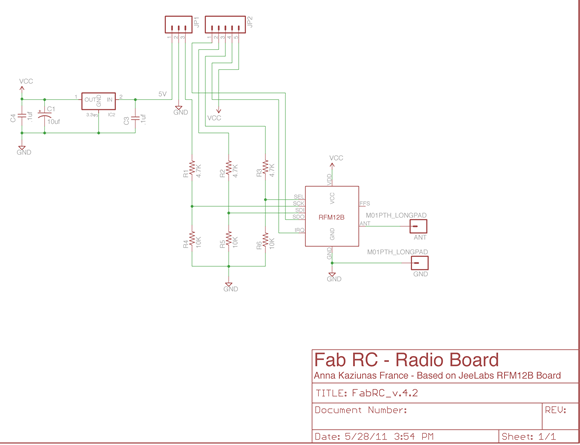
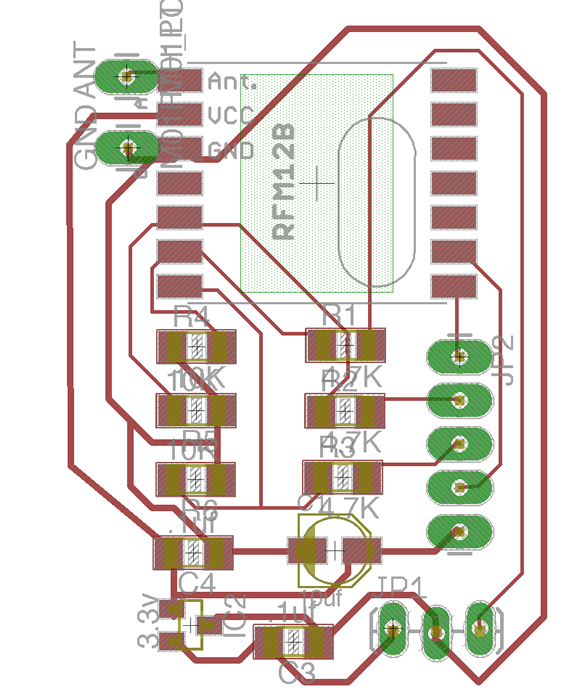
  • Radio and battery boards designed, milled and working

Completed Radio Boards


Completed Hello Arduinos

Completed Battery Connector Boards


Completed Hello Arduino w/ Analog Pin Header
There were no analog pins pulled out to a header on the hello Arduino board – I needed some for this project – so I added an analog pin header.

Hello Arduino w/ Analog Pin Header (traces & outline)

Battery Connector PNGs (traces & outline)

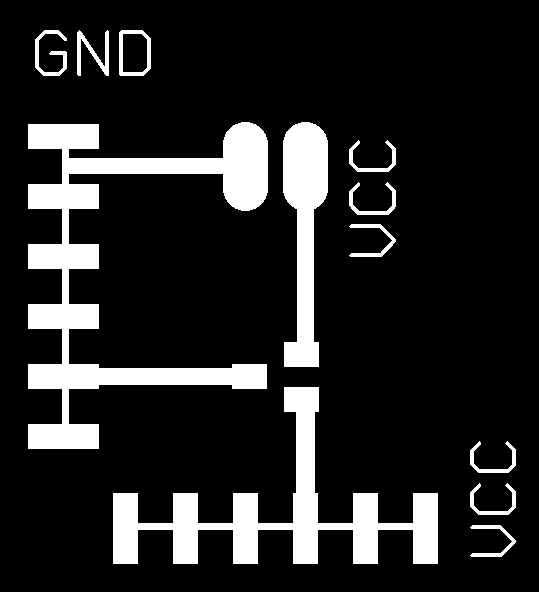
Radio Board PNGs (traces & outline)

Not Completed / Not Working Yet

  • The radio communication code has not been tested yet (short on the radio boards – still troubleshooting)
  • Still working on the press-fit car design – the car axels are not ready yet.
  • The servo controls are not hooked up.

Download Design Files (Eagle)

Get PNGs For Milling

Bill Of Materials

  • Coming Soon / Export from Eagle Files

Development Plans

  • Finish building the car
  • Test the radio boards
  • Hook up controls to the servos
Categories
Fab Academy AS220 - Providence, RI Fab Academy Providence -Year II - Teaching

FabRC – Project Developments

I am working towards my Fab Academy final project – a digitally fabricated RC car.

Items Completed So Far:

Radio boards have been designed (based on the JeeLabs RFM12B Board)


I designed the battery connector boards
battery_schem
battery_board

Hello Arduino boards milled, stuffed and programmed with Arduino bootloaders and tested with the servos

Tasks That Still Need to Be Completed:

  • Radio boards need to be milled and assembled.
  • Battery connector boards need to be milled and assembled.
  • Radio boards need to be tested to see if they communicate with each other
  • Car controls need to be figured out
  • Code needs to be modified / written and tested to make the radios communicate with each other.
  • Code needs to be written for the car controls.
  • Car framework (wheels, axels, body) needs to be designed and assembled

Items That Still Need to Be Resolved / Not Working Yet:

  • No analog pins on the Hello Arduino? How to hook up the controls?
  • Use Fabkit instead? (burned the bootloader, but the Arduino IDE won’t talk to the chip).
  • “Fingers crossed” that the radio boards will actually work.

Completion Schedule:

  • Planning on completing the project by the June 1 deadline . Otherwise, before the August 15 final completion date.
Categories
Fab Academy AS220 - Providence, RI Fab Academy Providence -Year II - Teaching

FabRC – Final Project Planning

This week at Fab Academy we are planning our final projects.  I am creating a digitally fabricated RC car.  First I defined my all the system components, how they would interact with each other and what the logic / voltage levels needed to be throughout that system.

Logic Levels / Radio – Functional Block Diagram

What Will It Do?

  • Drive forward / stop
  • Turn left / right
  • Use radios to control the car wirelessly.

Who’s Done What Beforehand?

  • David Mellis made pressfit cars – this one needs to be more of an enclosure to house the electronics
  • JeeLabs: http://jeelabs.org/ has created some code and designs that I plan to modify and use with the Hope RF radios.

What Materials and Components Will Be Required?

  • 2 servos
  • 2 radio boards (utilizing the Hope RF radios)
  • 1 or 2 Arduino boards (hello Arduino boards)
  • Masionite
  • LEDs (possible decoritive addition)
  • Acrylic (possible decoritive addition)
  • Possibly plastic to cast parts (possible decoritive addition)
  • Metal rods for axels?
  • copper-clad PCB stock
  • Various components already in the inventory

How Much Will It Cost?

  • $0 – $20 Most parts already in the inventory.
  • Need to purchase Hope RF radios – $12.00 for a pair.
  • Need to purchase a few additional non-standard, non-inventory components from Digikey ($10.00 + shipping).

What Parts and Systems Will Be Made?

  • Connect the radio boards to the Arduino
  • Figure out how to issue commands to control the car
  • Turn lights on and off

What Processes Will Be Used?

  • Laser-cut press fit for the car body (possibly being replaced by molded shell / parts)
  • Milled circuit boards.
  • Molded parts for wheels / accessories

What Tasks Need to Be Completed?

  • Need to investigate how to get the boards to talk to each other.
  • Control with computer keys at first.
  • Would like to eventually add a wireless joystitck control box.

What Is The Schedule?

  • This Week –> Design the car and investigate the how to talk to the radios
  • Next Week –> Troubleshoot the project, work on the control structure.

How Will It Be Evaluated?

  • Can the radios talk to each other?
  • Do the controls work?
Categories
Fab Academy AS220 - Providence, RI Fab Academy Providence -Year II - Teaching

Hello (Make Your Own) Arduino

arduino
For reasons I haven’t uncovered yet, I was unable to use the Arduino IDE to burn the bootloader to a fabbed Arduino board. For my first attempt at this, see the Fabkit / Fabduino post. Also see Ed Baafi’s Fabkit / Fabduino page for how to program an fabbed Arduino without an external clock through the Arduino IDE. In both OS X and Ubuntu I was unable to connect to the board through the IDE. Shawn Wallace suggested that I use the following code. (See “To Program Your Arduino” section below) The code below worked for me in Ubuntu. NOTE: This code below works for a using an external 8MHZ resonator, see the links to the .png files.

Download the Files

Download Files to Mill
Get the files from the Fab Academy site
Download the Arduino Bootloader File for the Atmega168
Right click to save the files

To Program Your Arduino:

Set the fuses with:

Paste code is all in one line

avrdude -c usbtiny -p m168 -B 5 -u -U lock:w:0x0F:m -U  efuse:w:0x00:m -U
hfuse:w:0xdd:m -U lfuse:w:0xf6:m -P usb

Burn the bootloader with:

Paste code is all in one line

avrdude -P usb -c usbtiny -p m168  -u -U flash:w:ATmegaBOOT_168_pro_8MHz.hex
-U lock:w:0x0F:m -B .2

The options used:

  1. -u –> Disable safemode, default when running from a script.
  2. -U :r|w|v:[:format] –> Memory operation specification. Multiple -U options are allowed, each request is performed in the order specified.