Categories
07 3D Molding and Casting Fab Academy Providence -Year I - Student Projects Laser Cutting

Completed TARDIS Cast | Working Light

This project went through many adaptations and in the end, it did not turn out as a blue box, but more like a weathered garden statue. The hydrostone did not turn out completely white, but grime on the urethane molds made little swirls, further enhancing the marbleized look. It is not bigger on the inside, but the wiring and battery did fit nicely within the internal cavity. A switch turns it on and off. Although this endeavor did not turn out exactly as planned, I learned many things about thinking in 3D and many more about construction and molding objects in 3D.

So what makes this model a “TARDIS” not just a model of a British police box that looks like a light-up garden statue? Honestly, nothing but my intent. I set out to make a model of the TARDIS and that is what it will be called.

finished model

The process I used to create this model:

Previous Posts:

1. I designed the TARDIS in Google Sketchup.
> See Previous Post: TARDIS: 3D Modeling

2. I used the Modela to mill out the front, 3 individual sides and roof of the model in machinable wax.
> See Previous Post: TARDIS: Moldmaking

3. I used the block of machinable wax to create urethane molds of each of the pieces.
> See Previous Post: TARDIS: Moldmaking

Laser-Cut The Casting Container:

4. I designed and laser cut an adjustable press-fit box to place the individual urethane molds in order to cast the TARDIS in hydrostone. (I also custom-cut shims to key in the urethane mold edges.)

Inside BoxInside BoxTaped Up Boxpreparing to castrubber moldInside Box

Putting Together the Casting Container / Aligning the Mold:

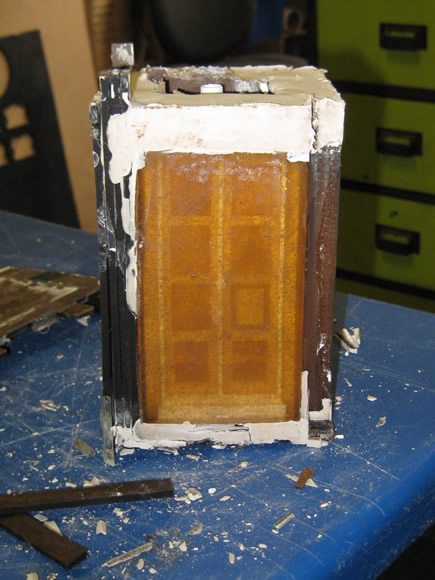
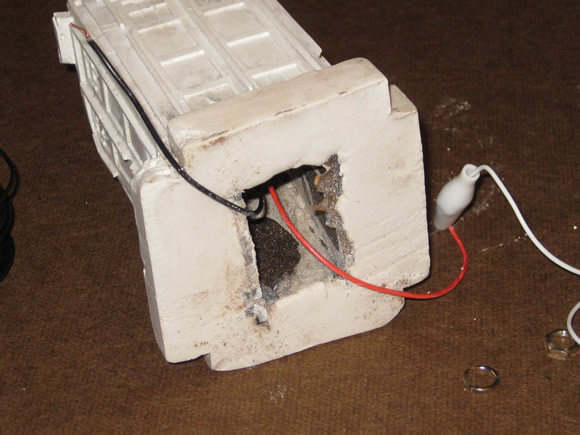
5. When casting, I did my best to align the sides and roof together at the appropriate angles and hoped for the best. An additional laser-cut box with an empty pen casing was inserted into the larger mold when pouring the hydrostone in order to create a cavity for the wires to run form the LED on the top through the cast down into the base where the wiring, battery and other components are housed. The inside box then became part of the cast.

casting

Casttaped up boxremoving box

Removing the Casting Container:

6. When taking apart the mold, I found that some of the fine details of the windows and the moldings became stuck in the urethane mold or broke off easily. I may not have mixed the hydrostone long enough, or there may have been an issue with the proportions I used. Further experimentation is this matter is needed to determine the source of the problem. This breaking away of the fine detail gave the statuette a weathered appearance, like a tombstone left out in the elements.Freshly CastFreshly CastFreshly CastFreshly CastFreshly CastFreshly CastFreshly Cast

Adding the Electrical Components:

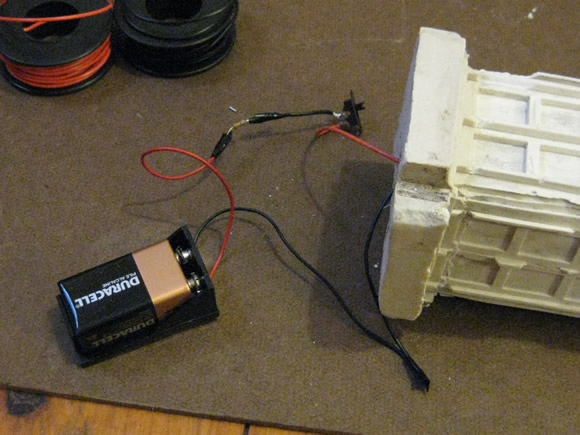
7. In addition – I wanted to have a LED light on the top to simulate the police box light, so when cutting the outside casting box, I cut a congruent interior box (see number 4. pictures above.) This small inside box allows for an open area for the wiring from the LED through the top of the hole in the stone to the battery. The wiring consists of:

  • 1 ultra bright white 10 mm LED
  • 1 330 ohm resistor
  • 1 small switch
  • 1 battery connector and a 9V battery
  • A few lengths of wire

Prototyping the circuit

protyping the circuitprototyping the circuit

I dedicate this project to David Tennant for his the excellent portrayal of the 10th Doctor, which has just come to an end.

The 10th Doctor and His Tardis
Image © BBC

Categories
07 3D Molding and Casting Fab Academy AS220 - Providence, RI Fab Academy Providence -Year I - Student Projects

TARDIS: Moldmaking

I am still working on my Fab Academy 3D Molding and Casting project (a 3D model and cast of the TARDIS. The implementation of my model proved complicated.

Wax molds with frames

The Fab Academy Assignment

  • Machine a mold and cast parts in it

The Project: TARDIS multi-mold cast

Starting with the cad.py created .rml files (for details on the 3D modeling process see my TARDIS: 3D Modeling post), I carved several molds out a block of machinable wax using the Modela milling machine.

Wax Molds

Wax MoldsWax MoldsWax MoldsWax MoldsWax MoldsWax Molds
Tardis Wax Mold

There were a few mishaps creating these molds. The z-max setting was not high enough on the side mold (you can see where the Modela bit drug through the wax and made lines that were not part of the design.). I learned that it pays to set the z-max close to the max of 1 so that it will clear the edges of the design. However, because this particular design took so long to mill out , 7 hours or so, I opted not to redo it if the damage was minor. Instead, I attempted to repair the damaged areas with wax.

After I made the wax molds, I made casts of each side and the roof using urethane rubber. The door was cast once, but the side needed to be cast 3 times to create the 3D object.

I did not allow for space at the top of the wax molds, so to ensure that the rubber would have enough room to capture the top of the design, I laser-cut some tempered masonite frames in to increase the vertical space for the rubber to fill. These frames also make it a little easier to get the rubber out of the mold.

Creating and Gluing the Frames

cut framesframes

Mixing Urethane / Creating the Molds

At Fab Academy Providence, we used a smooth-on 2 part urethane mold mix. Just mix equal parts of each container (A and B) and mix slowly in a figure eight pattern to minimize the bubbles.
Rubber MoldsRubber MoldsRubber Molds

What I learned about this material:

  • Mix very thoroughly. Take your time (at least 10 – 15 minutes if you can stand it). The end result will be sticky if the parts are not mixed together well – My first two molds were sticky.)
  • Add heat. Heat both accelerates the process and creates a less sticky end product. I used a desk lamp positioned in close proximity to the freshly poured mold.
  • Be careful not to leave the heat on longer than 15 minutes or so and let the wax and rubber cool before removing the rubber mold from the wax.
  • I learned the heat lesson the hard way when my mold melted from excessive heat. (see photos below)

Beware of Melting Molds

melted moldmelted mold

All The Molds (Good and Bad)

all molds

Skills Learned

Tools Used

Next Steps:

  • Create a box and system for keying in the sides of the police box so it can be cast.
  • Get LED, resistor and battery to wire up the light on the top.
  • Cast in hydrastone
Categories
02 Computer-Aided Design / Modeling Fab Academy AS220 - Providence, RI Fab Academy Providence -Year I - Student Projects

TARDIS: 3D Modeling

My 3D Modeling and Casting project is to make a model of the outside of the TARDIS.  I used the scale and dimensions from G. Hartley’s plans to make an 8 inch model TARDIS.

G. Hartley’s Original Plans

Tardis Measurement Model

The Fab Academy Assignment

  • design a 3D model of a potential semester project
  • render it
  • extra credit: physically model it

The Project: 3D model of TARDIS

Skills Learned

  • Learned how to create a 3D model
  • learned to think in three dimensions – advance planning of how objects are put together before modeling.

Tools Used

  • Google Sketchup

I used these plans to create a 3-D model in Google Sketchup

Tardis 3D Model

However, as the milling machine cannot carve out negative space, the faces on the sides or the model could not be created.  In order to create a machinable mold, I had to take the 3D model apart into three sections:  the roof, the front door and a side (3 of the sides are the same).

In addition, I also removed some details that were in the original 3D model, like the light on top of the box and the all of the “Police Box” lettering.  The light was not transferring properly into the CAD file and the lettering would be too fine for the bit on the milling machine. (I plan to create a sticker or letter by hand). I also scaled the model down from 8 inches high to 4.8″ so it could fit within the block of machinable wax.

Shawn Wallace  suggested that I cast an LED into the model and use it for the light on top of the box.  Brilliant.

The Roof, Side Door and Front Door

Tardis Faces

Sketchup exports .stl ASCII files and I needed them to be in binary.  I opened the files in Meshlab and then exported them as .stl binary files.   Next I ran the .stl files through stl2png.py to convert the depths to grayscale.

The final result (roof not shown)

tardis png
The next steps are:
1. Mill out the 3 of the mold pieces
2. Cast with rubber, making 3 casts of the side view
3. Create a laser-cut box that will hold the mold together when it is being cast with hydrastone.
4. Cast with hydrastone.